You have just bought a wool wheel and a polisher and do not know where to start? Worried that a mistake will scratch your car? Or the result after polishing is disappointing and you do not know what went wrong?
These are the problems beginners run into most often.
In fact, polishing with a wool wheel is not difficult. Once you have the correct steps and technique, even a beginner can achieve a professional-grade result. This article takes you from zero to polishing with a wool wheel in the simplest way possible, avoiding all the common mistakes.
Want the full picture on wool wheels? We suggest reading The complete guide to wool brushes and wool wheels first, to understand the definition, uses and basics of wool wheels, and then coming back to learn the practical work.
Before polishing: tools, environment and surface preparation
Good preparation is half of a successful polish.
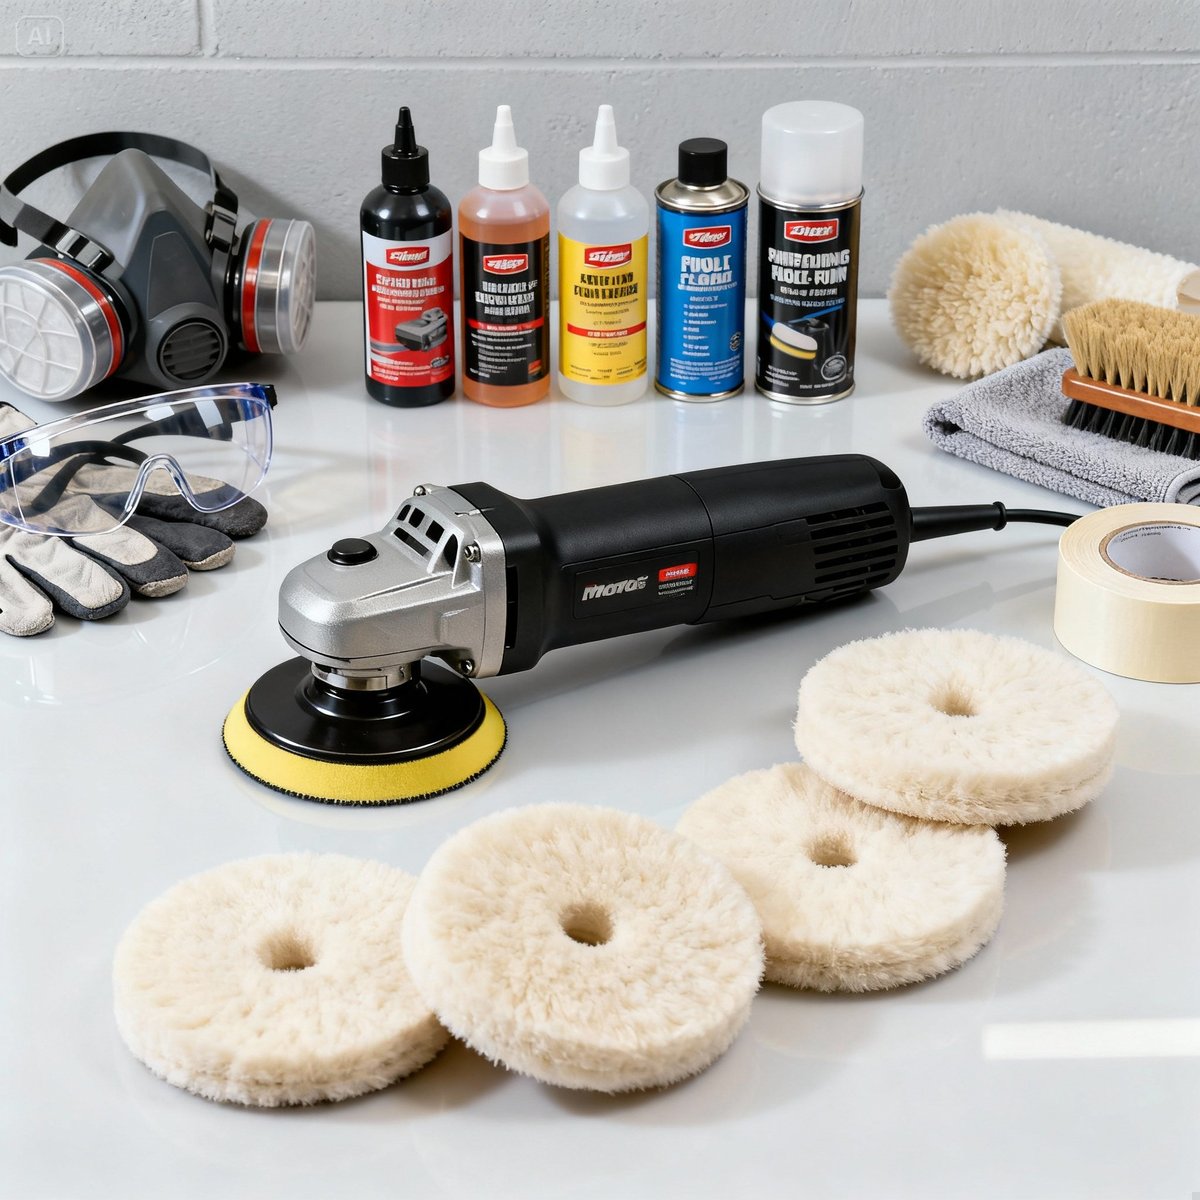
Essential tools
Power tools:
- An electric polisher or angle grinder (variable speed, 800-2000 RPM recommended)
- An extension cord (if needed)
Polishing materials:
- Wool wheel (soft or medium density, chosen by use)
- Polishing compound or polishing wax (chosen by material)
- Masking tape (to protect areas that are not to be polished)
Cleaning supplies:
- Clean water or a dedicated cleaner
- Clean cloths (microfiber is best)
- Wool wheel cleaning brush
Safety protection:
- Dust mask (to avoid breathing in abrasive dust)
- Safety goggles (to protect against splattering polishing compound)
- Work gloves (to protect your hands)
YC Brushes offers a full set of polishing tools. See the product list to buy suitable wool wheels and accessories.
Should you clay bar before polishing? The test is whether the surface feels rough
Stroke the paint lightly with your fingers through a plastic bag. If you feel grittiness, contaminants have become embedded in the paint. Going straight to the wool wheel at this point means dragging those particles across the paint as an abrasive, which creates new fine scratches. The correct order is clay bar first, then polish.
Which contaminants a clay bar deals with
An ordinary car wash removes surface dust and dirt, but it cannot remove these five kinds of embedded contamination: tar spots, industrial fallout (metal particles in the air), tree sap and insect residue, iron particles from brakes, and paint oxidation. They make the paint feel rough, and they affect how well wax and coatings adhere afterward.
How to choose among the three grades
| Grade | Cleaning power | Suitable vehicle condition | Risk |
|---|---|---|---|
| Fine | Light | New cars, regular maintenance every 3–6 months | The safest, does not scratch easily |
| Medium | Moderate | Ordinary vehicles, 1–2 years without maintenance | A balance of cleaning power and safety |
| Heavy | Strong | Heavy oxidation, serious industrial fallout | Higher; best left to a professional |
Beginners should start with Fine, and Medium is enough for most cases. We do not recommend using the Heavy grade yourself: its abrasive power is enough to leave marks in the paint that need another round of polishing to correct.
The 5 steps of wool wheel polishing in detail
Follow these 5 steps and even a beginner can produce a professional result.
Step 1: Choose a suitable wool wheel
Choose the wool wheel according to the job.
By material:
- Car paint polishing: soft wool wheel (5-6 inch)
- Metal polishing: medium-density wool wheel (6 inch)
- Heavy oxidation: hard wool wheel (6-7 inch)
By stage of the job:
- Rough polishing (removing oxidation): medium or hard
- Fine polishing (raising the gloss): soft
Beginners should start practicing with the soft grade, which is more forgiving.
Want to learn more about choosing wool wheel specifications? See the wool wheel specification and buying guide, which has a full breakdown of sizes, materials and prices.
Step 2: Mount the wool wheel on the power tool
Mounting a hook-and-loop wool wheel:
- Confirm the backing plate of the polisher is clean and free of debris
- Align the wool wheel with the center of the backing plate
- Press firmly to make sure the hook-and-loop is fully engaged
- Pull gently to test that it is held securely
Mounting a threaded wool wheel:
- Align the wool wheel with the screw hole of the angle grinder
- Turn clockwise to tighten
- Tighten it properly with a wrench
- Check for any looseness
Safety reminders:
- Always unplug the power cord when mounting
- Run a test after mounting and confirm there is no abnormal wobble
- If anything is abnormal, stop the tool immediately and check
Step 3: Choose an appropriate polishing compound
Different materials need different polishing compounds.
Polishing compounds for car paint:
- Cutting compound (Cut): removes oxidation and scratches
- Fine polish (Polish): raises the gloss
- Finishing polish (Finish): achieves a mirror finish
Metal polishing pastes:
- Stainless steel, aluminum and copperware each have their own dedicated polishing paste
- Which color goes with which material differs from brand to brand, so go by the intended use printed on the packaging
Wood care wax:
- Natural wood wax or wood oil
How to choose:
- Serious oxidation → cutting compound
- Light defects → fine polish
- Regular maintenance → finishing polish
Step 4: Low-speed test run
The final check before starting.
What to check:
- Whether the wool wheel is mounted securely
- Whether there are obstacles nearby
- Whether the power cord could get tangled
- Whether you are wearing your protective equipment
Test run steps:
- Set the speed to the lowest (around 800 RPM)
- Start the tool and run it in the air for 10-15 seconds
- Watch whether the wool wheel rotates smoothly
- Listen for any abnormal sound
- Feel for any abnormal vibration
If something is abnormal:
- Too much wobble → remount the wool wheel
- Abnormal sound → check whether the screw has come loose
- Strong vibration → the wool wheel may be out of balance; replace it with a new one
Only after confirming everything is normal should you move on to the actual polishing.
Step 5: Apply the polishing compound
Method 1: Apply to the work surface (recommended)
- Dot the polishing compound onto the area to be polished
- Work on an area of 30 x 30 cm at a time
- About 3-5 dots are enough (not too much)
Method 2: Apply to the wool wheel
- Start the tool at low speed
- Touch the polishing compound lightly to the rotating wool wheel
- Let the wool wheel pick it up evenly
Advice for beginners: method 1 is safer and less likely to splatter.
Controlling the amount:
- ✅ A thin layer is enough
- ❌ Do not apply too much (it causes splatter and waste)

💡 Need professional wool wheel products?
Contact YC Brushes now and let over 40 years of manufacturing experience help you find the most suitable wool wheel, or see the full product list to buy professional polishing tools.
6 common mistakes in wool wheel polishing
Avoid these mistakes and the polishing result improves immediately.
Mistake 1: Setting the speed too high
What it looks like:
- Using a high speed of 2000 RPM or more from the start
- Polishing compound splattering everywhere
- The surface quickly getting hot or even burning
Why does this mistake happen?
- The belief that the higher the speed, the better the result
- No idea of adjusting the speed
- The tool defaults to a high speed
The right way:
- Beginners start at 800-1000 RPM
- Increase gradually to find the best speed
- Better a little slow than too fast
- Monitor the surface temperature at all times
How to recover:
- Lower the speed immediately
- Wait for the surface to cool
- Check whether damage has already been done
- If there are burn marks, the surface has to be abraded again
YC Brushes recommends: buy a variable-speed polisher so you can control the speed precisely and avoid mistakes.
Mistake 2: Pressing down too hard
What it looks like:
- Pressing the polisher hard against the surface
- An uneven polish
- The wool wheel wearing out quickly
- Possible waviness or holograms
Why does this mistake happen?
- The belief that it only works if you press hard
- Worry that the force is not enough
- Arms that are too tense
The right way:
- The weight of the tool itself is all that is needed
- Relax your arms and hold the tool lightly
- Let the wool wheel touch the surface naturally
- Keep it gliding steadily
How to tell if you are pressing too hard:
- The wool wheel is clearly flattened and deformed → too much force
- The polisher is hard to move → too much force
- Your arms ache → wrong posture
How to recover:
- Relax your arms and reduce the pressure
- Polish the uneven areas again
- Practice a light gliding feel
Mistake 3: Neglecting to clean the surface
What it looks like:
- Polishing directly without cleaning
- Grit and dust being dragged across the surface
- New scratches being created
- More scratches the more you polish
Why does this mistake happen?
- Cleaning seems a bother and you want to save time
- No dust is visible, so the surface is assumed to be clean
- Not understanding how important cleaning is
The right way:
- Always wash thoroughly before polishing
- Use clean water and a cleaner
- Start only after the surface is completely dry
- Touch it with your hand to confirm there are no particles
How to recover:
- Stop polishing immediately
- Clean the surface thoroughly again
- Check whether the wool wheel has picked up grit
- Clean the wool wheel and start again
This is the most common mistake and also the easiest to avoid.
Mistake 4: Using the wrong polishing compound
What it looks like:
- A metal polishing compound used on car paint
- A cutting compound used for fine polishing
- A polishing compound that does not match the material
- A poor result or even damage to the surface
Why does this mistake happen?
- Not understanding how polishing compounds are classified
- Using whatever comes to hand
- Assuming all polishing compounds are interchangeable
The right way:
| Material | Suitable polishing compound |
|---|---|
| Car paint, rough polishing | Cutting compound (Cut) |
| Car paint, fine polishing | Fine polish (Polish) |
| Stainless steel | Polishing paste for stainless steel |
| Aluminum | Polishing paste for aluminum |
| Copperware | Polishing paste for copperware |
| Wood | Wood wax or wood oil |
Always check the intended use on the label when buying.
How to recover:
- Stop using the wrong polishing compound
- Clean the surface thoroughly
- Redo the work with the correct polishing compound
Want to know how to choose polishing products and wool wheels for waxing? See the complete guide to wool brushes and wool wheels, which explains the softness grades of wool wheels for waxing and how to choose them.
Mistake 5: Not cleaning the wool wheel regularly
What it looks like:
- Continuing to use a wool wheel that is loaded with polishing compound
- Wool fibers clumping and hardening
- A polishing result that gets worse and worse
- Even scratching the surface
Why does this mistake happen?
- Not wanting to interrupt the work
- Not knowing it needs cleaning
- Finding it a bother and wanting to finish in one go
The right way:
- Clean every 15-20 minutes
- Clean immediately when you feel the resistance increase
- Comb with a wool wheel cleaning brush
- Continue once the loft is restored
Consequences of not cleaning:
- The polishing compound builds up and hardens
- The wool wheel loses its resilience
- Uneven friction causes scratches
- The life of the wool wheel is shortened by 50% or more
How to recover:
- Deep clean the wool wheel immediately
- Wash with water to remove the hardened polishing compound
- If it cannot be restored, replace it with a new wool wheel
YC Brushes recommends: keep 2-3 wool wheels in rotation, so one can be swapped in while another is being cleaned and the work is not slowed down.
Mistake 6: Abrading before judging what type of problem it is
This is a reminder that the industry raised again in August 2026, and it is also the gap in understanding that we see most often.
The car detailing brand McPRO Taiwan (part of Hengyue International, a Taiwanese company) said in August 2026 that it has recently kept receiving cases of scratched glass from consumers, and that some of the damage was not caused by the original contaminant but was "secondary scratching" produced during do-it-yourself cleaning or improper polishing.
The head of the brand pointed out that when a surface is not clear, the most common problem is that consumers choose a tool with stronger abrasive power without first judging the type of contamination or damage:
"It all looks like hazy glass, but oil film, water scale, chemical etching, wiper marks and physical scratches are in fact completely different problems. If the judgment is wrong at the start, glass that only needed cleaning can, through excessive scrubbing or abrasion, end up with real scratches that need polishing to repair."
Why this applies equally to wool wheel polishing
The case is about glass, but the cause is exactly the same as with paint: the question is not "whether to polish" but whether the abrasive power of the tool matches the severity of the problem. Of all the tools in this article the wool wheel has the strongest abrasive power, so the cost of a wrong judgment is also the highest:
- When using scouring pads, melamine sponges or powder-type abrasives, if the tool carries grit, or the abrasive particles cannot stay evenly dispersed, a large number of fine scratches may be left
- A contaminated wool wheel scratches the surface in the same way. This is the same mechanism as "Mistake 5: Not cleaning the wool wheel regularly" above
- The mark of secondary scratching is that it may not be visible in daylight, but at night, facing street lights or oncoming headlights, radial glare and fine swirl marks appear
The order of judgment before you start
- First confirm whether it is something stuck to the surface (tar, iron particles, tree sap), chemical hazing, or a real physical scratch
- Something stuck to the surface → start with a low-abrasion method (see the section "Should you clay bar before polishing?" above; a clay bar used by hand with plenty of lubricant comes before going straight to the wool wheel)
- Only once it is confirmed to be a physical scratch does abrasive correction with a wool wheel come into the discussion
- When unsure, test a small area first: the cost of a test spot is always lower than redoing the whole panel
⚠️ A note on the nature of the source: the case and statements above come from the explanation McPRO Taiwan gave to the media (Yahoo News, 2026-08-24). They are practical observations put forward by a business, not independent third-party testing. We cite them because the mechanism described is consistent with the logic of selecting polishing tools, not because they are supported by a controlled experiment.
Real cases: before and after
Real cases show what wool wheel polishing can do.
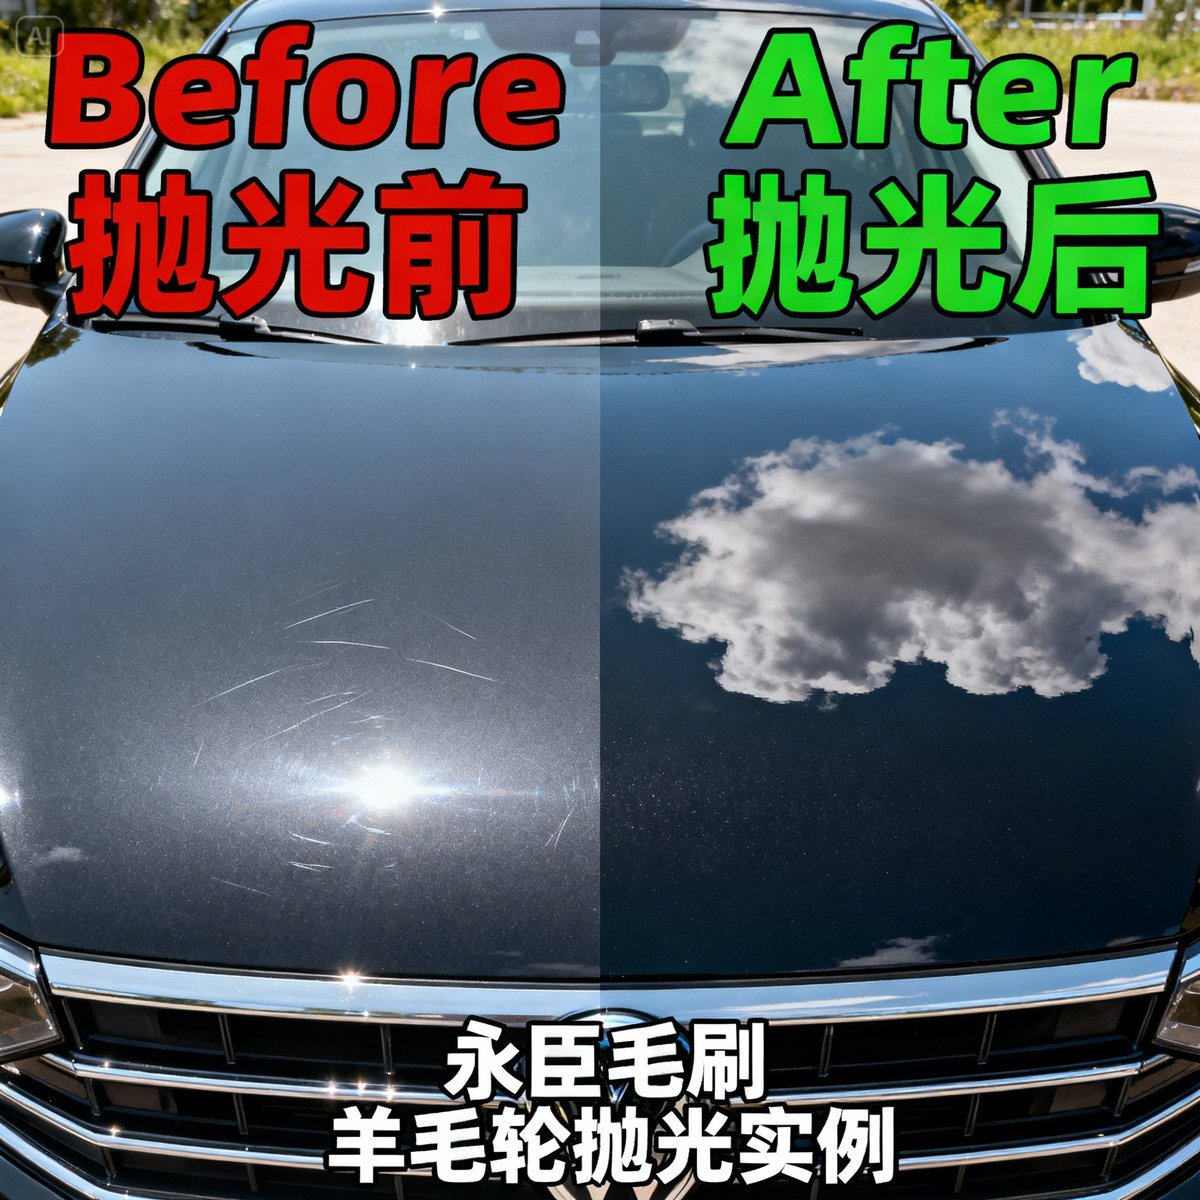
Case 1: Correcting oxidized paint on a 10-year-old car
Customer background:
- Vehicle: a 10-year-old black sedan
- Problem: the paint was badly oxidized, had lost its gloss and looked hazy
Tools used:
- 5 inch medium-density wool wheel
- Cutting compound for car paint (Cut)
- Variable-speed polisher (set to 1200 RPM)
Work process:
- Wash the body thoroughly
- Polish with cutting compound and the wool wheel (first pass)
- After cleaning, polish with fine polish and a foam pad (second pass)
- Apply a protective wax
Before:
- The paint was hazy with no gloss
- The oxidation layer was severe and had turned whitish
- Covered in light scratches
After:
- The paint recovered its deep black color
- Gloss improved by about 85%
- The fine scratches had largely disappeared
Customer feedback: "I did not expect a 10-year-old car could be brought back like this. Wool wheel polishing really works!"
Technical points:
- Serious oxidation needs a medium-density wool wheel
- Two stages, rough polishing plus fine polishing
- Always protect with wax after polishing
Case 2: Mirror polishing stainless steel kitchen equipment
Customer background:
- An industrial-grade stainless steel worktable
- Problem: weld marks, scratches and oxidation spots on the surface
Tools used:
- 6 inch hard wool wheel
- Polishing paste for stainless steel (blue)
- Angle grinder (set to 1500 RPM)
Work process:
- Roughly grind down the raised welds
- Polish with the wool wheel and polishing paste
- Work section by section, repeating 3-5 passes on each
- Finish with fine polishing using a cloth wheel
Before:
- A clear height difference at the welds
- A rough surface with many scratches
- Local oxidation that had turned black
After:
- The welds were level and smooth
- A mirror gloss was achieved
- The surface was smooth and gave a clear reflection
Technical points:
- Metal polishing needs a higher speed and a hard wool wheel
- Stainless steel needs several rounds of polishing to reach a mirror finish
- A dedicated polishing paste is important
Case 3: Restoring oxidized silver jewelry
Customer background:
- A sterling silver bracelet that had not been maintained for a long time
- Problem: badly oxidized and blackened, with the silver luster gone
Tools used:
- 3 inch soft wool wheel
- Polishing paste for silver jewelry
- Small electric grinder (set to 800 RPM)
Work process:
- Soak in a dedicated cleaner for 5 minutes
- Polish the details with the small wool wheel
- Pay special attention to the gaps between the chain links
- Spray on a protective agent after polishing
Before:
- The silver looked dark gray
- A thick oxidation layer
- The metallic luster was gone
After:
- The bright white of sterling silver was restored
- A mirror gloss
- The details came out clean
Technical points:
- Use a small wool wheel for delicate items
- Low speed, to avoid damage
- Pre-treating with a cleaner gives a better result
These real cases show that wool wheel polishing has a wide range of applications and a marked effect.
Advanced technique: key points for polishing different materials
Different materials call for different techniques.
Advanced technique for car paint
Light-colored paint (white, silver):
- Advantage: scratches are less visible, more forgiving
- Recommendation: use a soft wool wheel
- Speed: 1000-1500 RPM
- Key point: avoid over-polishing, which causes color differences
Dark-colored paint (black, dark blue):
- Difficulty: scratches and holograms are very visible
- Recommendation: use the softest wool wheel
- Speed: 800-1200 RPM (beginners)
- Key point: polish in a cross pattern to avoid marks in one direction
Metallic and pearl paint:
- Properties: contains metal particles, harder
- Recommendation: medium-density wool wheel
- Speed: 1200-1500 RPM
- Key point: after polishing the gloss surpasses ordinary paint
Judging when it is finished:
- Inspect in sunlight or under strong light
- No obvious scratches or holograms
- A clear reflection and even gloss
Technique for polishing metals
Stainless steel:
- Properties: high hardness, wear resistant
- Recommended wool wheel: hard, 6 inch or larger
- Speed: 1500-1800 RPM
- Polishing paste: for stainless steel
- Technique: repeated polishing is needed to reach a mirror finish
Aluminum:
- Properties: a softer material that oxidizes easily
- Recommended wool wheel: medium density, 5-6 inch
- Speed: 1000-1200 RPM
- Polishing paste: for aluminum
- Technique: light pressure, avoid over-abrading
Copper / brass:
- Properties: oxidizes easily and forms verdigris
- Recommended wool wheel: soft or medium, 5 inch
- Speed: 1000-1500 RPM
- Polishing paste: for copperware
- Technique: apply a protective wax immediately after polishing to prevent re-oxidation
Chrome-plated parts:
- Properties: a thin surface layer that must not be over-abraded
- Recommended wool wheel: soft, small size
- Speed: 800-1000 RPM (low speed)
- Polishing paste: extra-fine abrasive particles
- Technique: polish lightly to avoid wearing through the plating
Technique for wood and other materials
Solid wood furniture:
- Use a soft wool wheel
- Speed: 600-800 RPM (very low speed)
- Use with wood wax or wood oil
- Polish along the grain
Plastic products:
- Choose the softest wool wheel
- Speed: 500-800 RPM
- Use a polishing compound for plastics
- Avoid staying in one place too long, which melts the surface
Composite materials:
- Test a small area first
- Use a low speed and a soft wool wheel
- Watch how the material reacts
- Work on large areas only after confirming it is safe
Advice on aftercare
Protection after polishing:
Car paint:
- Wax within 24 hours after polishing
- Or apply a protective coating
- This extends the polishing result by 3-6 months
Metal:
- Apply a metal protective wax
- Or use a rust inhibitor
- Avoid re-oxidation
Wood:
- Reapply wood oil regularly
- Keep the wood moisturized
- Keep it out of sun and rain
Maintenance frequency:
- Car paint: polish and wax again every 3-6 months
- Metal: every 3-12 months, depending on the degree of oxidation
- Wood: maintain once a quarter
With these advanced techniques, you have already moved from beginner toward a professional level!
Conclusion: the road to better polishing technique
Congratulations on working through the whole wool wheel polishing tutorial!
The stages of learning from beginner to professional
Stage 1: Beginner (practice sessions 1-5)
- Get familiar with operating the tool
- Master the basic 5 steps
- Control the speed and the pressure
- Avoid the 6 common mistakes
Stage 2: Skilled and advancing (practice sessions 6-20)
- Improve polishing efficiency
- Try different materials
- Learn to judge when the job is finished
- Shorten the working time
Stage 3: Professional (practice session 21 onward)
- Handle complex cases
- Control the details precisely
- Achieve a mirror-grade result
- Able to take on jobs for customers
Advice for continued improvement
Practice regularly:
- Practice at least 1-2 times a month
- Keep your feel and technique
Record your experience:
- Take before/after photos
- Note the best settings for different materials
- Build up your own experience
Learn and exchange:
- Watch professional polishing videos
- Join a car detailing community
- Exchange techniques with fellow enthusiasts
Upgrade your tools:
- Upgrade to better tools as your experience grows
- Try wool wheels from different brands
- Find the combination that suits you best
Professional support from YC Brushes
YC Brushes has worked in brush manufacturing for over 40 years and offers all-round support.
Product advantages:
- A choice of natural and synthetic wool wheels
- A full range of sizes from 3 to 8 inches
- Soft, medium and hard densities all available
- Factory-direct quality assurance
Service and support:
- Free technical advice (answers to polishing questions)
- Wholesale discounts (15% off for 5, which is 85% of list price; 20% off for 10; 25% off for 20 or more, which is 75% of list price)
- Custom specification service
- Lead times quoted per specification (email us with your requirements)
How to reach us:
- Contact us now for your own quote
- See the full product range to buy wool wheels
- Learn about our services for custom requirements
Want to explore more specialist knowledge about brushes? Go to the blog to read more articles and keep improving your polishing technique!