You have bought an anti-static brush but do not know how to use it correctly? Why have the filaments gone out of shape after only a short time? Is the anti-static effect getting worse and worse? All of these problems come down to how the brush is used and cared for.
Correct use avoids scratching your belongings. Correct care can extend brush life 2-3 times. A Tamiya anti-static brush normally lasts 2-3 years; with the wrong care it may be finished in half a year. This article gives a full illustrated account of how to use a dust-removal brush correctly, professional techniques for different materials, the cleaning and care steps, and 5 secrets to a longer life, so that your anti-static brush performs at its best.
If you are not yet sure which brand of anti-static brush to buy, start with Anti-static brush recommendations 2026 | Tamiya / GIC / Daiso anti-static brushes compared and reviewed to learn the characteristics of the different brands. To see how well anti-static brushes remove dust, see Do anti-static brushes work? Test results analyzed.
Basic use of an anti-static brush (illustrated guide)
3 preparation steps before use
Step 1: make sure the surface is dry
An anti-static brush can only be used on dry surfaces. A damp or greasy surface will:
- Make dirt stick to the filaments
- Reduce the anti-static effect
- Make the filaments clump and deform
- Possibly scratch the surface of the item
If the surface is damp, wipe it with a dry cloth first or wait for it to dry naturally.
Step 2: check the condition of the filaments
A quick check before use:
- Are the filaments clean (no built-up dust)?
- Are the filaments fluffy (not clumped)?
- Are the filaments even (not bent or deformed)?
- Are the filaments intact (no heavy shedding)?
If the filaments are in poor condition, clean and care for the brush before using it.
Step 3: blow off the larger dust particles with an air blower first
This step is very important but often skipped. Larger dust particles may scratch the surface during brushing. Blow off the larger dust with an air blower first, then deal with the remaining fine dust with the anti-static brush.
The two together work best: air blower → anti-static brush → air blower (second check)
4 key points of correct brushing
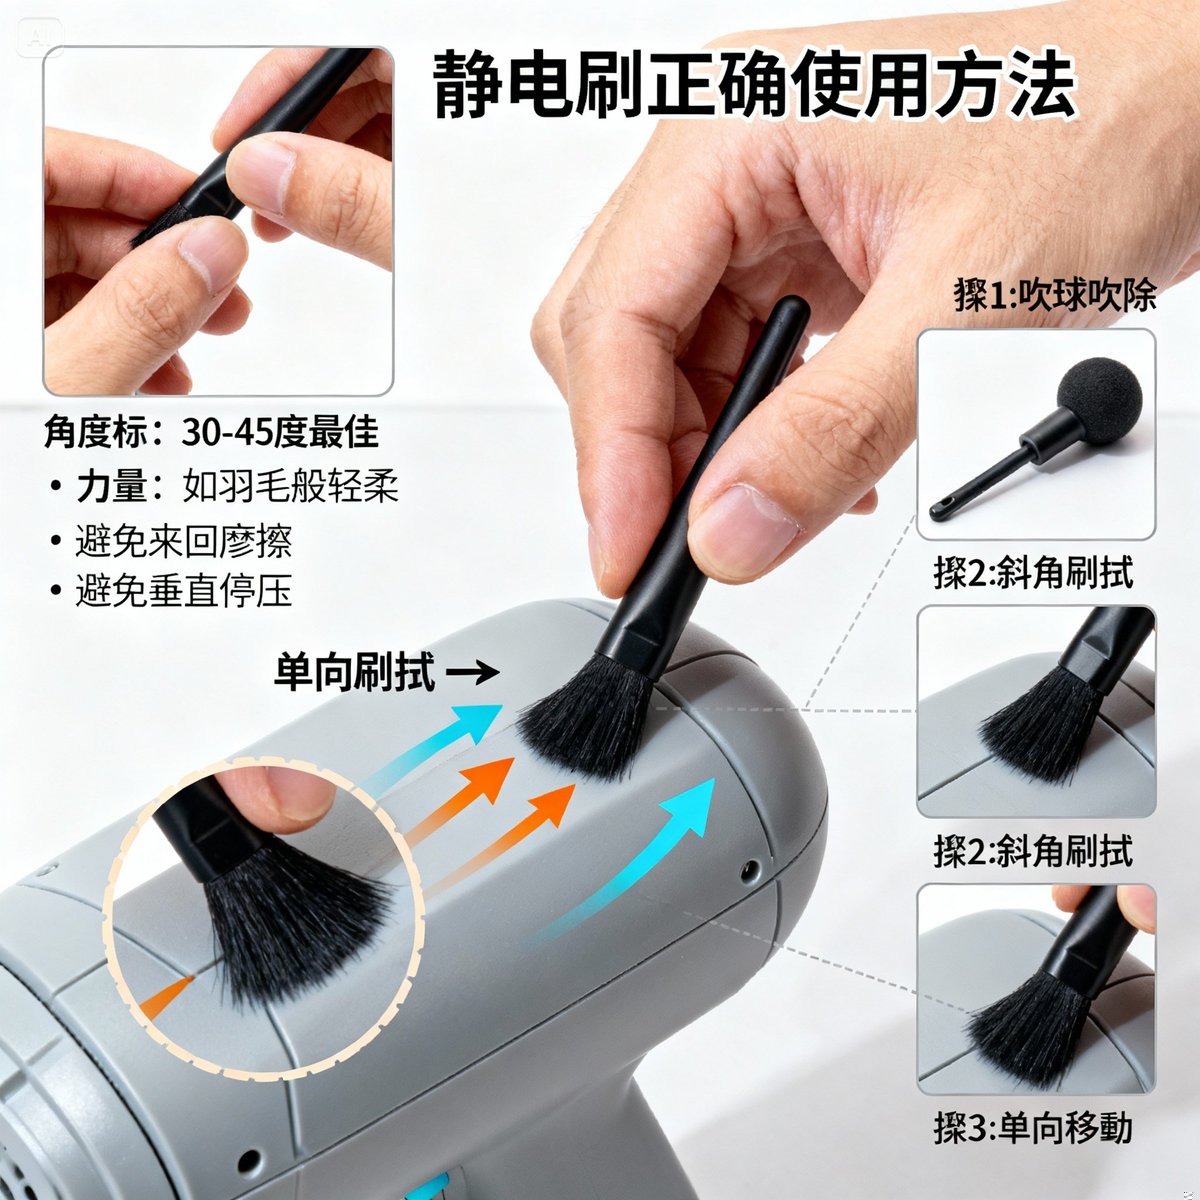
Point 1: hold the brush at 30-45 degrees
Hold the handle so that the filaments meet the surface at a 30-45 degree angle. Do not press straight down (90 degrees). Brushing at an angle lets the tips of the filaments touch the surface lightly, which gives the best dust removal.
Pressing straight down bends the filaments, raises the risk of scratching and reduces dust removal.
Point 2: brush lightly in one direction; avoid rubbing back and forth
Brush from left to right 3 times, or from top to bottom 3 times. Do not brush left and right repeatedly.
Rubbing back and forth will:
- Raise the risk of scratching
- Let the dust settle again
- Wear the filaments
Brushing in one direction carries the dust away with the stroke.
Point 3: pressure as light as a feather
This is the most important point. The pressure must be extremely light, like a feather sweeping across the surface. Only the tips of the filaments need to make contact.
Wrong: pressing hard while brushing → may scratch the surface Right: sweeping lightly over the surface → the tips of the filaments touch lightly and that is enough
The Tamiya anti-static brush uses organic conductive fiber combined with PBT resin filaments, and feels soft. Very light pressure is enough to remove dust effectively. Using force is counterproductive.
Point 4: slow, steady speed
Do not brush too fast. Move slowly and steadily so the filaments have enough time to carry the dust away.
Brushing fast scatters the dust and does not remove it effectively.
Professional techniques for different materials
The surfaces of different items have different characteristics, and the techniques differ too.
Plastic models (Gundam / architectural models)
Brushing direction: along the edges and the seam lines between parts
Models have many edges and details. Brush in the direction of the edge, not across it. Brushing across may catch the filaments on protruding parts.
Take the shoulder armor of a Gundam model: brush along the curve of the armor, and do not cut across its edge.
Avoid water-slide decals and stickers
If the model has water-slide decals, avoid the decal areas when brushing, or sweep over them extremely lightly. The edges of decals are easily lifted by the brush.
Decals that have not been sealed with a protective clear coat are even more fragile. It is best to wait until the clear coat is on before using the anti-static brush.
Dealing with gaps
Models have many gaps that the filaments cannot reach into. In that case:
- Touch the edge of the gap lightly with the tips of the filaments
- Use an air blower to blow the dust out of the gap
- Do not poke with hard objects such as toothpicks (they may leave scratches)
Painted surfaces need an even lighter touch
On a model that has been painted, the pressure must be lighter still. This applies especially to matte finishes, which show scratches more readily than gloss finishes.
On an unpainted straight-built model the pressure can be closer to normal, but it must still stay within the "light" range.
We recommend reading the full Tamiya anti-static brush unboxing and review to learn the characteristics of a professional modeling brush.
Electronics (computer cases / keyboards / screens)
Inside the case: brush from top to bottom
When cleaning the inside of a computer case:
- Always shut down and disconnect the power first
- Let it stand for 10 minutes so the capacitors discharge
- Wear an anti-static wrist strap (safer)
- Brush the dust off from top to bottom
Working from top to bottom lets the dust fall as you go. Finally, remove the dust at the bottom with an air blower or a small vacuum cleaner.
Keyboard: brush the gaps between keys at an angle
There are gaps between the keys of a keyboard. Insert the filaments into the gaps at an angle and brush gently. Do not poke straight down.
On a mechanical keyboard the keycaps can be pulled off for a more thorough cleaning.
Screen: sweep over it extremely lightly
The screen surface is the most fragile. The pressure must be extremely, extremely light; only the tips of the filaments should touch.
Advice:
- First blow off most of the dust with an air blower
- Then sweep over it lightly with the anti-static brush
- Finally wipe gently with a fiber cloth (if necessary)
Do not brush a screen hard. The surface of an LCD/OLED screen scratches easily.
Vents: brush in the direction of the openings
On the vents of a laptop or a desktop case, brush in the direction of the openings so the dust is carried out of them.
Do not brush the other way. That pushes the dust deep into the openings.
For detailed computer cleaning techniques, see the guide to computer dust-removal brushes.
Clothing (suits / coats / sweaters)
Brush along the grain of the fabric
Look at the direction of the grain of the fabric and brush along it. This is usually from top to bottom.
Brushing against the grain may make the fibers stand up and cause pilling.
Wool and napped fabrics need an even lighter touch
The fibers of wool sweaters and napped coats are finer. The pressure should be lighter than on ordinary fabric, and the number of passes should be reduced as well.
Over-brushing harms the fiber structure.
Avoid brushing the same spot repeatedly
2-3 passes over each area is enough. Do not keep brushing the same spot. Repeated brushing wears the fibers.
Dust shows more on dark clothing
Dust is especially visible on black suits and navy coats. Removing it with an anti-static brush gives a striking result.
After brushing, you can go over the garment once more with a roller
If the garment has hair or lint on it, remove the dust with the anti-static brush and then go over it with an adhesive lint roller. The two together work best.
Precision instruments (camera lenses / microscopes / measuring instruments)
Extremely gentle, with no pressure whatsoever
The surface coatings of precision instruments are extremely fragile. Any pressure may cause permanent damage.
The filaments should almost "float over" the surface, not "brush across" it.
Avoid sensitive parts
The coated area of a lens, the eyepiece of a microscope, the display of a measuring instrument: on these parts the anti-static brush should be avoided, or used with extreme care.
Dedicated cleaning tools (such as a lens pen or an air blower) are recommended.
Professional instruments call for professional tools
For expensive precision instruments (camera lenses costing tens of thousands of NT dollars, microscopes costing hundreds of thousands), we recommend the professional cleaning tools of that field.
An anti-static brush is suited to cleaning the housing and body of an instrument. It is not suited to cleaning optical elements.
Reference table of techniques by material
| Material type | Holding angle | Pressure | Number of passes | Special notes |
|---|---|---|---|---|
| Plastic models | 30-45 degrees | Light | 2-3 passes | Avoid decals; brush along edges |
| Computer case | 30-45 degrees | Light | 3-5 passes | Top to bottom; anti-static wrist strap |
| Keyboard | Inserted at 45 degrees | Light | 2-3 passes | Insert into the gaps at an angle |
| Screen | 20-30 degrees | Extremely light | 1-2 passes | Air blower first, then brush |
| Suit | 30 degrees | Medium to light | 2-3 passes | Along the grain of the fabric |
| Wool sweater | 20-30 degrees | Extremely light | 1-2 passes | Avoid repeated brushing |
| Camera lens | 20 degrees | Extremely, extremely light | 1 pass | Avoid the coating; use dedicated tools |
| Figures and ornaments | 30-45 degrees | Light | 2-3 passes | Watch for protruding parts |
Pair it with other tools to double the effect
An anti-static brush cannot do everything. It works better paired with other tools.
Pairing 1: anti-static brush + air blower
Combined effect: the dust removal rate rises from 70% to 85%
Used alone: brush with the anti-static brush → done Paired with an air blower: blow off the larger particles → remove the fine dust with the anti-static brush → second check with the air blower
Why is it more effective?
- The air blower removes the larger particles first, which avoids scratching
- The anti-static brush deals with the fine dust, where its anti-static advantage counts
- The second pass with the air blower makes sure even the depths of gaps are clean
Recommended air blower: a large photography blower (8-10 cm in diameter), which has enough airflow.
💼 Custom brush service from the factory
If you need:
- Dust-removal brushes to a special specification (specified filament material / length / stiffness / handle design)
- Discounts on bulk purchases (wholesale prices for group purchases by companies / schools / studios)
- Industrial-grade anti-static brushes (ESD certified, compliant with IEC standards)
YC Brushes - over 40 years of professional manufacturing experience
- ✅ Tooling and production to your drawings or samples
- ✅ Order quantities are quoted per specification, with better prices on bulk purchases; email us your requirements
- ✅ Advice on material selection (carbon fiber / conductive fiber / anti-static fiber)
- ✅ ESD anti-static certified
Ask for a quote now
- 📞 Phone: +886-2-2988-2721
- 📧 Email: [email protected]
- 🌐 Online form: Contact YC Brushes
Factory-direct × professional custom work × quality assured
Pairing 2: anti-static brush + cleaning gel
Combined effect: covers both flat surfaces and three-dimensional objects
Cleaning gel suits large flat areas (such as the surface of a keyboard), but it cannot deal with three-dimensional objects (such as models). An anti-static brush suits three-dimensional objects and gaps, but it is less efficient on large flat areas.
Used together:
- Flat surfaces → pick the dust up quickly with cleaning gel
- Three-dimensional objects / gaps → clean carefully with the anti-static brush
Note: cleaning gel may leave a sticky residue. After using it, you can go over the surface once more with the anti-static brush.
Pairing 3: anti-static brush + fiber cloth
Combined effect: the combination made for screen cleaning
The best procedure for cleaning a screen:
- Blow off the larger dust particles with an air blower
- Sweep over it lightly with the anti-static brush
- Wipe gently with a fiber cloth (microfiber cloth)
- Second check with the air blower
The three together leave a screen as clean as new.
Note: choose a microfiber cloth. Do not use an ordinary rag (too coarse).
Suggested tool sets
Basic set (budget):
- Anti-static brush (GIC or Daiso)
- Air blower (large photography type)
- Total outlay: in the budget range
Suited to: everyday cleaning, beginners
Advanced set (mid-range):
- Anti-static brush (Tamiya or GIC)
- Air blower (large photography type)
- Cleaning gel
- Fiber cloth
- Total outlay: in the mid-price range
Suited to: model builders, photography enthusiasts, perfectionists
Professional set (mid-to-high price and above):
- Tamiya anti-static brush (for precision items)
- A second anti-static brush (for computers)
- Budget anti-static brush (for rough work)
- Air blower
- Cleaning gel
- Fiber cloth set
- Anti-static wrist strap
- Total outlay: in the mid-to-high price range
Suited to: professionals, collectors, enthusiasts
5 common mistakes in use (must read)
❌ Mistake 1: brushing too hard
This is the most common mistake. Many people think that brushing hard is what gets things clean. The opposite is true.
The 3 problems with brushing hard:
- It scratches the surface of the item (paint, coatings)
- The filaments bend and deform
- The filaments break and fall out
The right way: pressure as light as a feather. Let only the tips of the filaments touch.
❌ Mistake 2: using it on a damp surface
An anti-static brush can only be used on dry surfaces. A damp surface will:
- Make dirt stick to the filaments
- Make the filaments clump
- Reduce the anti-static effect
- Possibly cause a short circuit (electronics)
The right way: make sure the surface is completely dry before use. If the surface is damp, wipe it with a dry cloth first or let it air dry.
❌ Mistake 3: brushing the same spot back and forth
The 3 problems with brushing back and forth:
- It raises the risk of scratching
- It lets the dust settle again
- It wears the filaments excessively
The right way: 2-3 passes in one direction is enough. Do not brush back and forth repeatedly.
❌ Mistake 4: never cleaning the filaments
Many people put the brush away after use and never clean the filaments. Over time:
- A large amount of dust builds up in the filaments
- The anti-static effect weakens
- The filaments clump and harden
- Old dust may be carried onto new items
The right way: after every use, tap the filaments lightly and clean them with an air blower. Deep clean once a week or once every two weeks.
❌ Mistake 5: improper storage (laid flat under weight)
Laying the brush flat, or letting other things press on the filaments, causes:
- Permanent deformation and bending of the filaments
- Flattened filaments that lose their loft
- Poorer dust removal
The right way: hang the brush up for storage and let the filaments hang down naturally. If it cannot be hung, at least keep the filaments clear of any surface.
Cleaning and care steps for an anti-static brush (illustrated guide)
Daily cleaning (after every use)
Time needed: 30 seconds
Step 1: tap the handle to shake off the dust Hold the handle and tap it lightly with your fingers 3-5 times so the dust clinging to the brush falls off.
Step 2: blow off the remaining dust with an air blower Blow at the filaments with the air blower, from the roots toward the tips, to remove the fine dust that remains.
Step 3: check the filaments by eye Check quickly for anything abnormal: shed filaments, bending, foreign matter tangled in them.
Step 4: hang it up for storage Hang it on a tool rack or the wall and let the filaments hang down naturally.
These 4 steps take only 30 seconds, but they greatly extend the life of the filaments.
Deep cleaning (once a week or once every two weeks)
Time needed: 10 minutes (with several hours of drying time)
Step 1: prepare clean water Prepare a basin of clean water at room temperature (about 20-25°C). Do not use hot water (it harms the filaments).
Step 2: rinse the filaments in clean water Dip the filament part of the brush into the water and swish it gently so the dust comes out. Do not soak the handle (water getting in can loosen it).
Step 3: press the filaments gently Press the filaments lightly with your fingers to squeeze out the built-up dirt. Do not wring or pull hard.
Step 4: rinse again in clean water Change to a fresh basin of clean water and rinse the filaments again, until the water runs clear.
Step 5: shake off the excess water Hold the handle and shake it downward firmly 5-10 times to throw off the excess water. Do not wipe with a towel (it deforms the filaments).
Step 6: dry naturally in the shade Hang the brush in a ventilated place and let the filaments dry naturally in the shade. This usually takes 2-4 hours.
Important things not to do:
- ❌ Do not use detergent / dish soap / soap (they destroy the anti-static effect)
- ❌ Do not use hot water (it harms the filaments)
- ❌ Do not use a hair dryer / tumble dryer (heat causes damage)
- ❌ Do not wring hard (it deforms the filaments permanently)
- ❌ Do not dry in the sun (ultraviolet light causes damage)
Suggested cleaning frequency:
- Heavy use (every day) → clean once a week
- Moderate use (2-3 times a week) → clean once every two weeks
- Light use (occasional) → clean once a month

5 secrets to extending the life of an anti-static brush
Secret 1: clean it right after use
Do the daily cleaning (tap + air blower) right after every use. Do not wait until a lot of dust has built up.
Effect: extends brush life by 30-50%.
How it works: built-up dust makes the filaments clump and harden and lowers the anti-static effect. Cleaning at once keeps the filaments in their best condition.
Time invested: only 30 seconds.
Secret 2: hang it up to avoid pressure on the filaments
Hanging storage is the most important way to extend brush life.
Comparison test:
- A Tamiya anti-static brush stored hanging → still fluffy after 3 years
- A Tamiya anti-static brush stored flat → clearly flattened after 1 year
Effect: extends brush life by 200%.
How to do it:
- Hang it on the wall by the hanging hole in the handle
- Hang it on a tool rack
- Hang it on a pegboard with an S-hook
- Put it in a pen holder (filaments up, not touching the bottom)
Secret 3: deep clean regularly
Even with daily cleaning, regular deep cleaning is still needed.
Deep cleaning can:
- Remove built-up dirt thoroughly
- Restore the softness of the filaments
- Restore the anti-static effect (partly)
Suggested frequency:
- Heavy use → once a week
- Moderate use → once every two weeks
- Light use → once a month
Effect: extends brush life by 50-100%.
Secret 4: avoid extremes of temperature and humidity
An anti-static brush should be kept at:
- Temperature: 15-30°C
- Humidity: 40-70%
- Away from direct sunlight
- Away from heat sources (heaters, computer vents)
The effects of extreme conditions:
- High temperature → the filaments harden and lose their spring
- Low temperature → the filaments turn brittle and break easily
- High humidity → the filaments go moldy and metal parts rust
- Low humidity → static increases and the anti-static effect falls
The ideal storage environment: indoors at room temperature, well ventilated, away from light.
Secret 5: divide the work by purpose
Do not rely on one anti-static brush for everything. Divide the work by purpose:
Precision brush (Tamiya):
- Reserved for models, cameras and precision instruments
- Touches only clean items
- Can last 3 years
Everyday brush:
- For computers, keyboards and desks
- Moderate cleaning needs
- Can last 2 years
Rough-work brush (Daiso):
- For toolboxes, shoe cabinets and balconies
- No worry about wear
- Lasts 3-6 months, but it is no great loss
Dividing the work can:
- Extend the life of the precision brush by 200-300%
- Maintain the best cleaning results
- Avoid cross-contamination
Investment advice: instead of using one Tamiya for everything and wearing it out in 1 year, divide the work between a Tamiya and a Daiso. The Tamiya then lasts 3 years.
When to replace an anti-static brush: 6 signs
Even with proper care, an anti-static brush has a limited life. When the following signs appear, consider replacing it.
Sign 1: many split filaments
The tips of the filaments split into 2-3 strands and feel rough, not smooth. This means the filament fibers are worn.
Effects:
- Dust removal falls by 30-50%
- The surface of items may be scratched
- The anti-static effect weakens
Criterion: more than 30% of the filaments split → replace
Sign 2: filaments permanently deformed or bent
The filaments are bent and do not recover, staying bent even after cleaning. This means the filament structure is damaged.
Effects:
- They cannot touch the surface evenly
- Dust removal falls sharply
- Brushing is not smooth
Criterion: more than 20% of the filaments deformed → replace
Sign 3: the anti-static effect is clearly weaker
Items attract dust again soon after cleaning. This means the anti-static effect has faded.
Causes:
- Deterioration of the conductive fiber
- The anti-static coating wearing off
- Broken conductive filaments
How to check: measure with a static tester. A surface resistance above 10^11 ohms → not effective enough.
How an ordinary user can tell: items attract dust faster after brushing than they used to → the effect has weakened.
Sign 4: filaments turned stiff and rough
The filaments feel stiff and rough and have lost their softness.
Causes:
- Wear from long use
- Not being dried properly after getting damp
- Material aging caused by sun exposure
Effect: the risk of scratching items rises sharply.
Criterion: clearly less soft than a new brush → replace (especially for a modeling brush)
Sign 5: heavy shedding and thinning
Many filaments fall out with every use, and the filaments are visibly sparse.
Causes:
- The fixing has failed
- Corrosion at the roots of the filaments
- The brush is past its service life
Effects:
- Dust removal falls
- Shed filaments are hard to clean up
- They may be left in the gaps of precision items
Criterion: density below 50% of a new brush → replace
Sign 6: odor or mold
The filaments have an odor or black mold spots.
Causes: not being dried properly after getting damp, or a damp storage environment.
What to do: replace at once. Moldy filaments contaminate the items being cleaned.
Expected life by brand
Tamiya anti-static brush:
- Normal use: 2-3 years
- Heavy use: 1.5-2 years
- With proper care: up to 3-4 years
GIC anti-static brush:
- Normal use: 1.5-2 years
- Heavy use: 1-1.5 years
- With proper care: up to 2-3 years
Daiso / Showba / POYA (budget household chains in Taiwan):
- Normal use: 3-6 months
- Heavy use: 2-4 months
When 2 or more replacement signs appear, we recommend replacing the brush. Continuing to use it may damage the items being cleaned.
The ideal way to store the brush
Best: hanging storage
Advantages:
- The filaments hang down naturally and do not deform
- Good ventilation, quick drying
- Saves space
- Easy to reach
How to do it:
- Hang it on the wall by the hanging hole in the handle (the ideal)
- Hang it on a pegboard (tools kept neat and tidy)
- Hang it on the rail of a tool rack (several brushes can hang side by side)
- Hang it on a shelf unit with an S-hook (flexible to adjust)
Suggested height: hang it at eye level. It is easy to reach and the condition of the filaments can be checked at any time.
Second best: a pen holder (filaments up)
If it cannot be hung, it can go in a pen holder.
Key points:
- Filaments up, handle down
- The pen holder must be deep enough (the filaments do not touch the bottom)
- The opening must be wide enough (the filaments are not squeezed)
- Only 1-2 brushes in it (to avoid them pressing on each other)
Advantages: protects the filaments, keeps the desk tidy, easy to reach
Disadvantages: poorer ventilation, may collect dust
❌ Ways to avoid
Flat in a drawer:
- The filaments are pressed flat and deform
- Other tools may press on them
- They pick up dust easily
Standing upright (filaments down):
- The filaments deform under the weight
- Dust builds up at the bottom
- No ventilation
Mixed in with other tools:
- The filaments get caught and tangled
- Cross-contamination
- Easily damaged
Sealed in a plastic bag:
- No ventilation, so mold forms easily
- Moisture cannot escape
- The filaments deform
The ideal storage environment
Temperature: 15-30°C (room temperature) Humidity: 40-70% (neither damp nor dry) Light: away from direct sunlight (ultraviolet light causes damage) Ventilation: good ventilation (quick drying) Location: away from heat sources (heaters, computer vents)
Ideal places: the wall beside the workbench, a tool rack, a pegboard, an indoor shelf unit.
For more on where to buy anti-static brushes, see Where to buy an anti-static brush? 10 sales channels compared on price, with current offers to find the channel that suits you best.
Conclusion: correct use and care extend brush life 3 times
Whether an anti-static brush lasts depends 80% on how it is used and cared for.
5 core points:
- Use it correctly: a 30-45 degree angle, light pressure, brushing in one direction
- Clean it at once: 30 seconds of cleaning after use (tap + air blower)
- Deep clean regularly: rinse in clean water once a week or once every two weeks
- Hang it up: let the filaments hang down naturally so they do not deform
- Divide the work by purpose: separate brushes for precision / everyday / rough work
How the results compare:
- Wrong use + no care: a Tamiya is finished in 6 months
- Ordinary use + basic care: a Tamiya lasts 1.5 years
- Correct use + proper care: a Tamiya lasts 3-4 years
Time invested: 30 seconds of daily cleaning each time + 10 minutes of deep cleaning a week = about 50 minutes a month. Return: the life of the anti-static brush is extended 2-3 times, and dust removal stays at its best.
Master the right method, and your anti-static brush will stay with you longer and clean just as well throughout.
Need a more durable industrial-grade anti-static brush? Contact YC Brushes. With over 40 years of professional manufacturing, we supply ESD-certified anti-static brushes and a custom specification service.
FAQ
How often does an anti-static brush need cleaning?
There are two kinds of cleaning: (1) Daily cleaning - done right after every use, and it takes only 30 seconds (tap the filaments lightly + clean with an air blower + hang up for storage). (2) Deep cleaning - depending on how often the brush is used: once a week for heavy use (every day), once every two weeks for moderate use (2-3 times a week), and once a month for light use (occasional). Daily cleaning extends brush life by 30-50%, and deep cleaning restores the softness of the filaments and part of the anti-static effect. Not cleaning leads to clumped, hardened filaments, a weaker anti-static effect and a life shortened by more than half.
Can an anti-static brush be washed with detergent or dish soap?
No! Never use any detergent, dish soap, soap or alcohol. These chemicals will: (1) destroy the anti-static coating on the filaments; (2) dissolve the protective layer on the surface of conductive fibers; (3) make the filaments stiff and take away their spring; (4) leave the anti-static effect completely gone. For deep cleaning, rinse only in clean water at room temperature (20-25°C). If the filaments are greasy (which should not happen), it means the brush is being used wrongly or should be replaced.
Why is hanging storage so important?
Hanging is the single most important way to extend brush life. In a comparison test, a Tamiya anti-static brush stored hanging was still fluffy after 3 years, while one stored flat was flattened after 1 year. The reason: the filaments are fine fibers and deform very easily. Laid flat, the filaments are pressed by gravity or by other objects and bend permanently. Hanging lets the filaments hang down naturally and keep their best shape. It also brings ventilation and quick drying, saves space and makes the brush easy to reach. If the brush cannot be hung, at least put it in a pen holder with the filaments up, and make sure nothing presses on them.
Does the anti-static effect of an anti-static brush weaken over time?
Yes. The anti-static effect fades gradually, but the rate depends on the filament material: (1) Organic conductive fiber (Tamiya) - fades slowest, with 70-80% of the effect still there after 2-3 years. (2) Other conductive fibers - fade at a moderate rate, with about 60-70% of the effect after 1.5-2 years. (3) Anti-static coating (budget models) - fades fastest, with only 30-40% of the effect left after 3-6 months. Causes of fading: deterioration of the conductive fiber, wear of the coating, broken conductive filaments. Proper care slows the fading but cannot prevent it entirely. When items attract dust again soon after being brushed, the effect has clearly weakened and it is time to consider a replacement.
Can a hair dryer be used to speed up the drying of an anti-static brush?
Absolutely not! The hot air of a hair dryer seriously damages the filaments: (1) heat makes the filaments stiff and takes away their spring; (2) it damages the conductive fiber structure; (3) the anti-static coating melts and stops working; (4) the filaments may deform permanently. Do not use a tumble dryer, a heater, an electric heater or any other heat source either. The right way: after washing, shake off the excess water firmly, then hang the brush in a ventilated place to dry naturally in the shade, which usually takes 2-4 hours. If you need it urgently, you can put it in front of an electric fan (room-temperature air) to speed things up, but drying naturally in the shade is still the best.
What can an anti-static brush clean, and what can it not?
✅ Suitable for cleaning: (1) dry items - plastic models, figures, books, camera bodies, keyboards, screens, suits, coats, desks, bookcases; (2) precision items - professional brands such as Tamiya are suitable; (3) ordinary items - budget brands are good enough. ❌ Not suitable for cleaning: (1) damp surfaces - they make the filaments clump and damage them; (2) greasy surfaces - they contaminate the filaments; (3) sticky substances - they stick to the filaments; (4) optical lenses - dedicated tools are needed; (5) food contact surfaces - for hygiene reasons. The general rule: dry, free of grease, and not in contact with food.
How long does an anti-static brush last? When should it be replaced?
Its life depends on the brand and the care: Tamiya (3-4 years with proper care, 2-3 years in normal use, 1.5-2 years in heavy use), GIC (2-3 years with proper care, 1.5-2 years in normal use, 1-1.5 years in heavy use), Daiso / Showba / POYA (3-6 months in normal use, 2-4 months in heavy use). The 6 replacement signs: (1) more than 30% of the filaments split; (2) more than 20% of the filaments deformed; (3) a clearly weaker anti-static effect; (4) filaments turned stiff and rough; (5) heavy shedding and thinning; (6) odor or mold. Replace the brush when 2 or more signs appear. Do not hold on to it: continuing to use it may damage the items being cleaned.
Why did the filaments of my anti-static brush deform so soon?
The 4 most likely causes: (1) the wrong storage method - laid flat or under weight; change to hanging. (2) wiping with a towel or wringing hard after washing - the water should be shaken off. (3) brushing too hard - it should be as light as a feather. (4) drying with a hair dryer - it should be dried naturally in the shade. The filaments are fine fibers and deform permanently very easily. Any improper handling causes permanent damage. Review how you use and care for the brush and correct the mistakes, and a newly bought brush will last longer.
What tool works best paired with an anti-static brush?
The most recommended combination: anti-static brush + air blower. Procedure: blow off the larger particles → remove the fine dust with the anti-static brush → second check with the air blower. The dust removal rate rises from 70% to 85%. The reason: the air blower removes the larger particles first and avoids scratching, the anti-static brush deals with the fine dust where its anti-static advantage counts, and the second pass with the air blower makes sure the depths of gaps are clean. A large photography blower (8-10 cm in diameter) is recommended for its airflow. Other combinations: + cleaning gel (quick cleaning of large flat areas), + fiber cloth (made for screen cleaning), + anti-static wrist strap (safer when cleaning inside a computer). The basic set is in the budget range, the advanced set in the mid-price range, and the professional set in the mid-to-high price range.
Does a budget anti-static brush (Daiso) need care?
Yes! Although a budget brush has a short life (3-6 months), correct care can: (1) extend its useful life by 50-100% (from 3 months to 6 months); (2) keep dust removal at a better level; (3) keep filaments from shedding onto the items being cleaned; (4) reduce how often it has to be replaced, saving money. The care is the same as for professional brands: tap + air blower cleaning after every use, a rinse in clean water once a week or once every two weeks, and hanging storage to avoid pressure on the filaments. An investment of only 30 seconds each time + 10 minutes a week lets a budget brush deliver its full value. An uncared-for Daiso brush is finished in 2-3 months, while a well-kept one lasts 6-8 months, which is very good value.