You bought a strip brush and came home full of enthusiasm, only to stare at the door frame: "How do I fit this?" Do I peel off the backing? Do I need screws? Which way should the filament face? What do I do at the corners? The questions pile up, and you worry about fitting it wrong and wasting your money.
Do not worry. Installing a strip brush is simpler than you think.
Most people can do it themselves without hiring a tradesperson. This article teaches you all 3 fixing methods: adhesive (done in 10 minutes), slot-in (for aluminum doors and windows) and screw-fixed (the most secure). Each method comes with detailed steps, a tool list and fixes for common mistakes, so that you get it right the first time.
If you are still not sure which strip brush to buy, we suggest first reading The complete guide to strip brushes 2026 | Sizes and specifications, uses, installation methods and buying recommendations to understand the choice of specifications.
Before you install | Tool list and things to note
Good tools are a prerequisite for a good job.
The tools needed to install a strip brush are simple, and most homes already have them. They are divided below into basic and advanced:
Basic tools (essential for the adhesive type)
1. Tape measure or ruler
- Purpose: measuring the length needed
- Suggestion: choose a tape measure of 5 meters or more, which makes it easy to measure long door frames
2. Utility knife or scissors
- Purpose: cutting the strip brush
- Suggestion: a utility knife works better on an aluminum alloy base, and scissors suit a plastic base
3. Detergent and a cloth
- Purpose: cleaning the surface of the door frame to ensure adhesion
- Suggestion: use dish soap or a neutral detergent; avoid oil-based cleaners
4. Alcohol or a petroleum-based stain remover
- Purpose: removing grease and improving the adhesion of the backing
- Suggestion: use 75% alcohol or isopropyl alcohol
5. Pencil
- Purpose: marking the installation position
- Suggestion: use a sharpened pencil so that the marks are accurate
Advanced tools (essential for the screw-fixed type)
6. Power drill or cordless drill
- Purpose: drilling the screw holes
- Suggestion: prepare a 2-3 mm drill bit (for pilot holes) and a screwdriver bit
7. Screwdriver
- Purpose: driving the screws
- Suggestion: Phillips or slotted, depending on the screw specification
8. Spirit level
- Purpose: confirming that the strip brush is level
- Suggestion: a phone app can be used instead (free)
9. Rubber mallet
- Purpose: tapping a slot-in strip brush into the channel
- Suggestion: avoid a steel hammer (it will scratch)
Things to note before installation
Check 1: Confirm the door frame material
- Wooden doors: all three methods are suitable
- Aluminum doors and windows: slot-in is the first choice, screw-fixed the second
- Steel doors: screw fixing is the most secure
- Glass doors: only the adhesive type can be used
Check 2: Measure the dimensions accurately
- Measure the length of the door frame and allow an extra 5-10 cm in reserve
- Confirm the width of the door gap and choose the right filament length
- The length for corners has to be calculated separately
To learn how to measure correctly, see How to choose a strip brush size: complete measuring guide and specification tables.
Check 3: Choose suitable weather
- Avoid rainy days or weather with humidity above 80% (the adhesive backing sticks poorly)
- Avoid temperatures above 35°C (the adhesive is too soft) or below 10°C (the adhesive is too hard)
- Spring and autumn are recommended for installation, when temperatures are moderate
Check 4: Clear the area around the door frame
- Move shoe cabinets and clutter away to make sure there is enough working space
- Have a rubbish bag ready for the offcuts
- Keep the door able to open fully, which makes the work easier
Method 1: Installing an adhesive strip brush (the simplest, done in 10 minutes)
The adhesive type is the method most people choose.
It needs no drilling, does not damage the door frame, can be used by renters, and is extremely quick to install. Here are the complete steps:
Where it fits, advantages and disadvantages
✅ Suitable in the following situations:
- Renters (drilling is not allowed)
- Smooth door frame surfaces (wooden doors / aluminum doors / smooth plastic doors)
- Interior doors and windows (bedroom / study / toilet)
- Temporary use (you may move within 1-2 years)
❌ Not suitable in the following situations:
- Rough surfaces (cement / brick walls / uneven surfaces)
- Exterior doors and windows (the adhesive fails in high heat)
- Damp environments (bathrooms / basements)
- Long-term use (more than 3 years)
Advantages:
- Extremely quick to install (10-15 minutes)
- No tools needed (only a utility knife)
- Does not damage the door frame
- Easy to remove
Disadvantages:
- Shorter service life (1-2 years)
- The adhesive fails easily in high heat
- Removal may leave adhesive residue
- Adhesion weakens over time
Tool checklist
- Tape measure
- Utility knife
- Detergent (dish soap)
- Cloth
- 75% alcohol
- Pencil
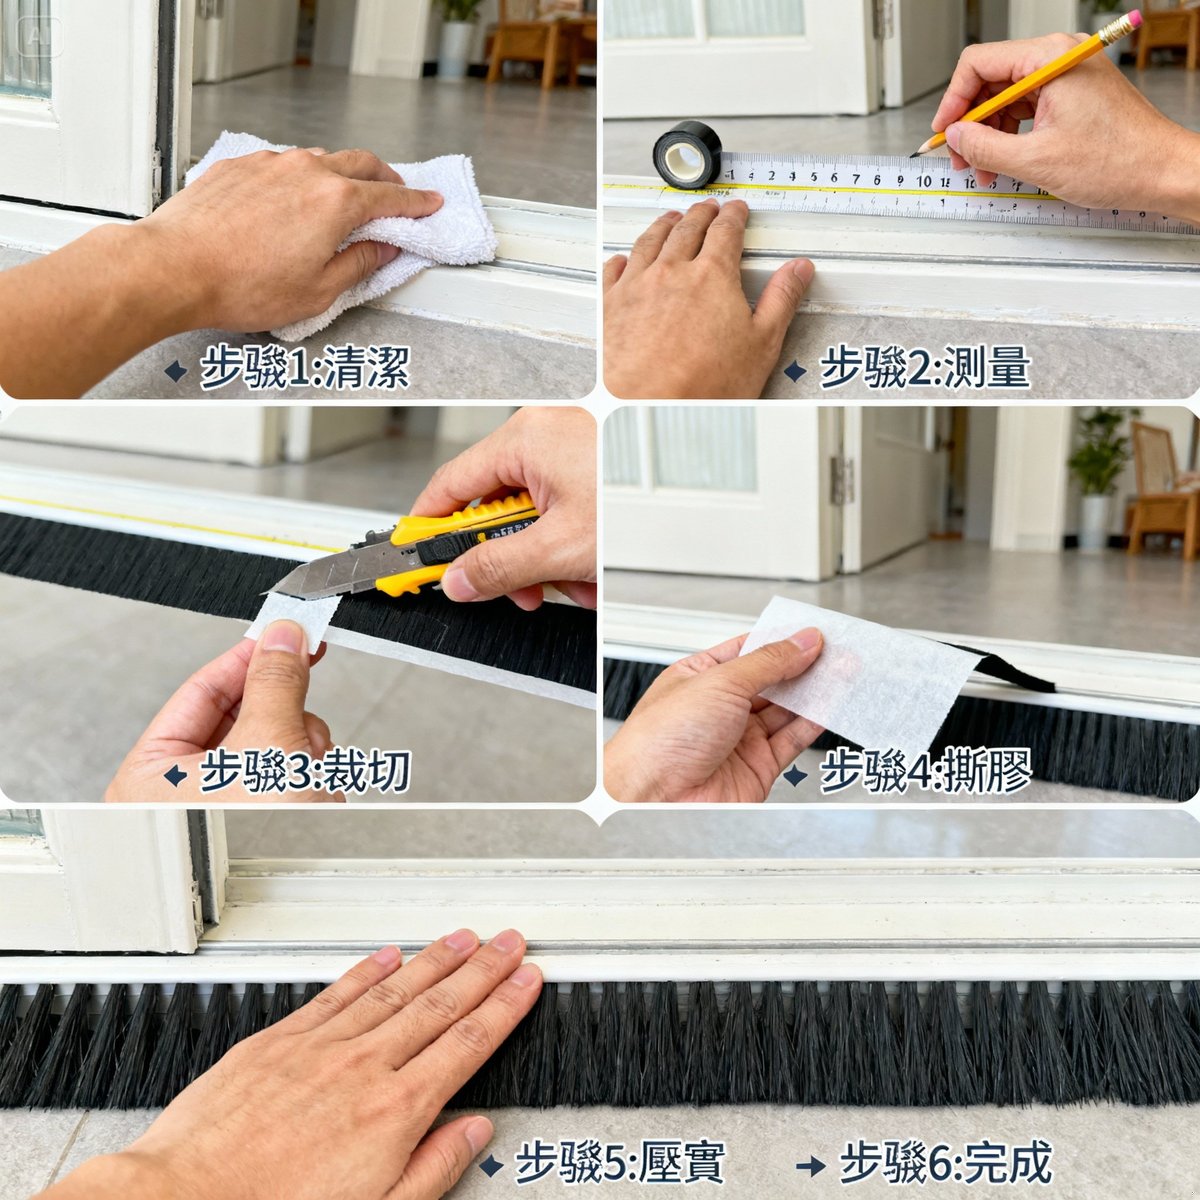
Detailed installation steps (8 illustrated steps)
Step 1: Clean the surface of the door frame
This is the most important step and directly affects adhesion.
- Wipe the area to be stuck with dish soap and water
- Remove grease, dust and old adhesive
- Wipe clean with water
- Wipe dry with a dry cloth
- Wipe once more with 75% alcohol (to remove residual grease)
- Wait 5 minutes for the alcohol to evaporate
Important: If there is grease on the surface, the adhesive will not hold and the strip will fall off within 3 days.
Step 2: Measure and mark the position
- Measure the length of the door frame with the tape measure
- Draw a light pencil line on the door frame to mark the position of the strip brush
- Confirm the filament direction: the filament must face the gap side; do not fit it the wrong way round
- Mark the corners with the pencil
Step 3: Cut the strip brush
- Cut to the measured length, allowing an extra 2-3 cm (it can be trimmed later)
- Cutting an aluminum alloy base with a utility knife: score the base once and snap it off
- Cutting a plastic base with scissors: simply cut through
- The filament can be trimmed to length with scissors
Pro tip: At corners, make a 45-degree miter cut so that the joint closes tightly.
Step 4: Dry fit to confirm
- Do not peel off the backing yet; hold the strip against the door frame to check the position
- Confirm that the length and the filament direction are correct
- Open and close the door to confirm that it does not catch
- If there is a problem, there is still time to adjust now
Step 5: Peel off the backing
- Starting from one end, peel off 5-10 cm of the backing paper
- Do not peel it all off at once (it is easy to stick it on crooked)
- Peel as you stick, and work slowly
A common mistake: Peeling off all the backing at once, sticking the strip on crooked, and then having a hard time re-sticking it.
Step 6: Stick down and press firmly
- Line up with the pencil marks and start sticking from one end
- Press hard with your palm for 10 seconds to make sure the adhesive is in full contact
- Press once for every 5-10 cm you stick down
- Keep peeling the backing as you stick, all the way to the other end
Pro tip: A roller or a wooden stick can be used to help press it down, for an even better result.
Step 7: Deal with corners and joints
- Corners: make a 45-degree miter cut on both strip brushes so that they close tightly at 90 degrees when joined
- Joints: butt the two strip brushes together and make sure the filament faces the same way
- Trim off any excess with the utility knife
Step 8: Test and adjust
- Wait 10 minutes for the adhesive to settle
- Open and close the door 10 times to test how smoothly it moves
- Shine a flashlight on the door gap and check whether light still leaks through
- If the filament is too long and the door catches, trim 2-3 mm with scissors
- If you find it is crooked, peel it off and re-stick it immediately (after more than 30 minutes it becomes very hard to peel)
Common problems and solutions
Q1: What should I do if it falls off after a few days?
A: The most common cause is that the surface was not cleaned properly. Before re-sticking, be sure to clean thoroughly with alcohol and confirm that the surface is dry. If it still falls off, the cause may be:
- Poor-quality adhesive (a cheap product): switch to a version with 3M adhesive backing
- An unsuitable door frame material (too rough): switch to screw fixing
- An environment that is too damp: choose a waterproof adhesive backing
Q2: What should I do if adhesive residue is left after removal?
A: Wipe with a petroleum-based stain remover or alcohol, wait 5 minutes for it to soften, then wipe it off with a cloth. Stubborn residue can be heated with a hair dryer and then wiped.
Q3: How long after sticking can the door be opened and closed normally?
A: We suggest waiting 24 hours for the adhesive to cure fully. For the first 24 hours, avoid opening and closing the door forcefully; push it gently.
How to extend the life of the adhesive type
- Check regularly: every 3 months, check for signs of the strip coming off
- Avoid pulling: when opening the door, avoid kicking the filament
- Keep it dry: when mopping, keep water from seeping into the adhesive
- Reinforce in time: if you find it loose, reinforce it immediately with 3M double-sided tape
The adhesive type suits most people: it is good value for money and simple to install. If you need a more secure fixing method, see the screw-fixing method below.
Method 2: Installing a slot-in strip brush (the neatest, for aluminum doors and windows)
The slot-in type is the standard approach for aluminum doors and windows.
The base of the strip brush slots directly into a channel in the door frame, with no adhesive backing or screws, so it is the neatest and also the most secure. It does require a channel to be provided in the door frame, though, and in general only aluminum doors and windows have one.
Where it fits, advantages and disadvantages
✅ Suitable in the following situations:
- Aluminum doors and windows (most newer airtight windows have a channel)
- Door frames with a U-type / T-type / F-type channel
- Long-term use (5-10 years)
- When appearance matters (no adhesive or screws are visible)
❌ Not suitable in the following situations:
- Wooden doors / steel doors (usually no channel)
- Older doors and windows (no channel provided)
- A damaged or deformed channel
Advantages:
- The neatest (concealed installation)
- The most secure (held in the channel)
- Long service life (5-7 years)
- Easy to replace
Disadvantages:
- The door frame must have a channel
- More complicated to install (it takes skill)
- Corners are difficult to handle
Tool checklist
- Tape measure
- Utility knife
- Rubber mallet (important!)
- Slotted screwdriver (for removing the old strip brush)
- Vernier caliper (for measuring the channel dimensions)
Detailed installation steps (6 illustrated steps)
Step 1: Confirm the channel specification
There are three main types of channel on aluminum doors and windows:
- U-type channel: the most common, opening upward
- T-type channel: newer airtight windows, with a smaller opening
- F-type channel: opening to the side
Measure the width and depth of the channel with a vernier caliper and confirm that the base of the strip brush matches.
Important: The base must be 0.5 mm narrower than the channel. If it is too wide it will jam; if it is too narrow it will be loose.
Step 2: Remove the old strip brush
If there is already an old strip brush:
- Pry it up from one end with a slotted screwdriver
- Pull it out slowly along the direction of the channel
- Clear the dust and adhesive residue out of the channel
- Vacuum it clean
Step 3: Cut to a suitable length
- Measure the length of the door frame
- Cut the strip brush, allowing an extra 2 cm
- Make a 45-degree miter cut at corners
Pro tips:
- Use a try square to make sure the 45-degree angle is accurate
- Practice the miter cut on an offcut first
- The cut face must be smooth for the joint to close tightly
Step 4: Dry fit to confirm
- Without using force yet, place the strip lightly in the channel
- Confirm that the base can seat fully
- Check whether the corner joint closes tightly
- If there is a problem, adjust it now
Step 5: Tap it in to fix it
This is the most critical step.
- Tap the base of the strip brush lightly with the rubber mallet
- Start from one end and tap once every 10 cm
- Use moderate force; too much will deform it
- A "click" means it is fully seated
- Feel with your hand to confirm that the base is flush with the channel
Never use a steel hammer: it will scratch the surface of the aluminum frame!
Step 6: Deal with the corners
The corners are where skill is tested most.
- The 45-degree cut faces of the two strip brushes must close together completely
- Tap them together carefully with the rubber mallet
- If there is a gap, fine-tune the cut face with the utility knife
- Confirm that the filament faces the same way
Testing and adjustment after installation
Test 1: Pull test
Pull the strip brush lightly by hand to confirm that it does not come out easily. If it is loose, tap it again with the rubber mallet.
Test 2: Door opening and closing test
Open and close the door 20 times and confirm that:
- The filament does not catch on the door leaf
- The door opens and closes smoothly
- The filament makes full contact and seals
Test 3: Visual check
Shine a flashlight on the door gap and check whether light still leaks through. Pay particular attention to corners and joints.
Troubleshooting common installation problems
Q1: What should I do if the base is too tight and cannot be tapped in?
A: You may have bought the wrong specification, with a base that is too wide. Solutions:
- Sand the sides of the base lightly with sandpaper to reduce the width by 0.3-0.5 mm
- Or buy the correct specification instead
Q2: What should I do if the base is too loose and falls out?
A: The channel may be worn, or the base may be too narrow. Solutions:
- Stick a layer of thin double-sided tape on the side of the base to add thickness
- Or fix it with silicone sealant (not easy to replace afterward)
Q3: What should I do if there is a gap at the corner?
A: The 45-degree miter cut is not accurate. Solutions:
- Remove it and cut the miter again, using a try square to make sure it is 45 degrees
- Or fill the gap with silicone sealant (not attractive, but effective)
Installation tips from professional fitters
Tip 1: Do the corners first
Join the two strip brushes at the corner first, then slot in the whole length. The corner will close more tightly this way.
Tip 2: Leave room for expansion
Aluminum frames expand and contract with temperature. Make the strip brush 1-2 mm shorter than the door frame so that it does not lift when it expands.
Tip 3: Lubricate the channel
Spray a small amount of silicone lubricant into the channel and the strip will slot in more smoothly. Do not spray too much, though, or it will be too slippery and the strip will come loose.
Once installed, the slot-in type looks the best and is also the most secure. If your aluminum doors or windows have a channel, we strongly recommend this method.
🔧 Having trouble with installation? Let the professionals help!
Installation support from YC Brushes
✅ Free installation consultation: send us photos of the door frame and we will help assess the most suitable installation method
✅ Detailed installation guidance: an illustrated installation manual is included with the product
✅ Video tutorials: online video tutorials are available, and learning from video is faster
✅ Troubleshooting: if you run into a problem during installation, our customer service will help by email or through the contact page
✅ Professional installation service: for volume purchases or construction projects, a fitter can be arranged to install on site (charged separately)
💡 Why choose YC Brushes?
- Over 40 years of manufacturing experience: we understand all kinds of door frame structures and give the most professional advice
- Quality guarantee: products comply with CNS standards (Taiwan's national standards), so the result after installation is assured
- Complete service: help all the way from selection to installation
Contact us now and get free installation guidance!
👉 Contact YC Brushes now and solve your installation problem!
Method 3: Installing a screw-fixed strip brush (the most secure, for permanent use)
Screw fixing is the most traditional method and also the most secure.
It suits long-term use, will not come off, and can last 5-10 years. It does need drilling, which leaves screw holes in the door frame, so it is not suitable for renters.
Where it fits, advantages and disadvantages
✅ Suitable in the following situations:
- Your own home (drilling is allowed)
- Steel doors / wooden doors (where the slot-in type cannot be used)
- Long-term use (more than 5 years)
- Exterior doors and windows (not affected by wind and sun)
- Doors opened and closed very often (the main entrance door)
❌ Not suitable in the following situations:
- Renters (drilling is not allowed)
- Glass doors (they will crack)
- Thin wooden doors (the screws will go through)
Advantages:
- The most secure (locked in place by screws)
- The longest service life (5-10 years)
- Not affected by high heat / damp
- Suited to outdoor use
Disadvantages:
- Needs drilling (damages the door frame)
- More complicated to install (tools are needed)
- Screw holes remain after removal
Tool checklist
- Tape measure
- Utility knife
- Power drill (or cordless drill)
- Drill bit (2-3 mm, for pilot holes)
- Screwdriver
- Spirit level (or a phone app)
- Pencil
- Screws (usually supplied with the strip brush)
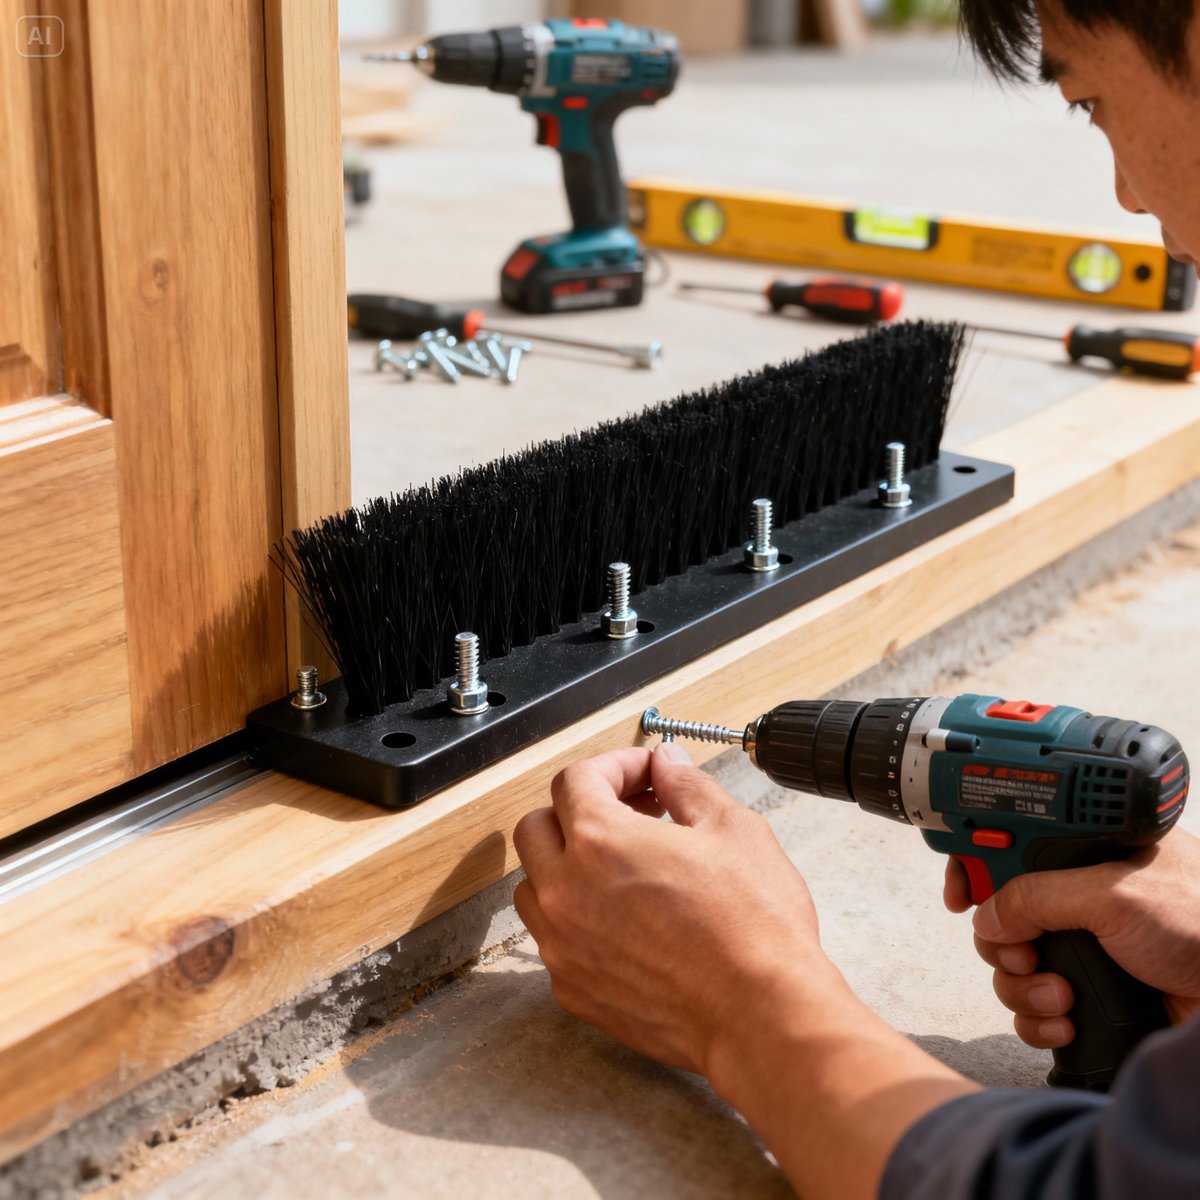
Detailed installation steps (7 illustrated steps)
Step 1: Mark the screw hole positions
- Measure the length of the door frame with the tape measure
- Draw a pencil line on the door frame to mark the position of the strip brush
- Mark the screw hole positions: one hole every 15-20 cm
- The first hole is 5 cm from the end
- Use the spirit level to confirm that the line is level
Important: If the screw holes are too far apart (more than 30 cm), the middle section will lift and the seal will be lost.
Step 2: Drill the pilot holes
Why drill pilot holes? To keep a wooden door from splitting and an aluminum door from stripping its threads.
- Drill the pilot holes with a 2-3 mm drill bit
- The depth is about 2/3 of the screw length
- Drill in perpendicular, not at an angle
- Wooden doors: drill a little more slowly to avoid splitting
- Aluminum doors: use a drill bit for aluminum
Step 3: Position the strip brush and line it up
- Place the strip brush on the marked position
- Line it up with the pilot holes
- Confirm that the filament direction is correct (facing the gap)
- Do not drive the screws yet; confirm the position once more
Step 4: Fix the first screw
- Fix the first screw at one end first
- Do not tighten the screw fully (leave a little room for adjustment)
- After confirming that the position is correct, drive the second screw (at the other end)
- Use the spirit level to confirm that the strip brush is level
Important: Fix both ends first so that the middle does not go crooked.
Step 5: Fix the other screws in sequence
- Drive the screws in sequence from one end toward the other
- Do not skip around (that leaves the strip uneven)
- After each screw, check with the spirit level
- Do not overtighten the screws, or the base will deform
Getting the force right: Tighten until the base sits firmly against the door frame, then turn another 1/4 turn and no further.
Step 6: Check that it is level and sits flush
- Use the spirit level to check whether the whole strip brush is level
- Feel with your hand to confirm that the base sits fully against the door frame
- If it lifts or is loose anywhere, adjust the screw at that point
Step 7: Test and fine-tune
- Open and close the door 20 times to test how smoothly it moves
- Shine a flashlight on the door gap and check for light leaks
- If the filament is too long and the door catches, trim it with scissors
- If you find a loose screw, tighten it again
Things to note
Note 1: Screw specifications for different door materials
- Wooden doors: use wood screws, 20-25 mm long and 3-4 mm in diameter
- Aluminum doors: use self-tapping screws, 15-20 mm long and 3 mm in diameter
- Steel doors: holes must be drilled first (a suitable drill bit may be needed); use machine screws
Note 2: Keep screws from going through
For thin wooden doors (less than 3 cm thick), use short screws (15 mm) so that they do not come through the other side.
Note 3: Preventing stripped threads in aluminum doors
Aluminum is a soft material, and screws strip their threads in it easily. Solutions:
- Use self-tapping screws made for aluminum
- Use a lighter force when driving the screws
- If a thread strips, move 5 mm and drill again
Common problems and solutions
Q1: What should I do if a screw will not tighten and keeps slipping?
A: The cause may be:
- The pilot hole is too large: use a screw one size larger, or pack the hole with a toothpick and drive the screw again
- The material is too soft (aluminum doors): use a thinner screw, or change the position
- Poor-quality screws: switch to better screws
Q2: What should I do if a wooden door splits as I drive the screw?
A: Ways to prevent it:
- Always drill a pilot hole first (this cannot be skipped)
- Avoid driving screws at the edge of the wood grain
- Use thinner screws
- Drive the screws more slowly
Q3: What should I do if the screws rust?
A: Stainless steel screws are recommended for exterior doors and windows to avoid rust. If they have already rusted, soften them with WD-40 penetrating oil, remove them and fit new screws.
The screw-fixed type is more complicated, but it is done once and for all and suits long-term use. If the home is your own, we strongly recommend this method.
Installation failures analyzed | Avoiding common mistakes
Even with detailed instructions, some people still fail.
We have gathered the 5 most common mistakes to help you steer clear of them.
Mistake 1: The surface was not cleaned and the adhesive did not hold
Cause:
Grease, dust or old adhesive on the surface of the door frame kept the adhesive backing from holding.
Solution:
- Wipe with dish soap
- Rinse clean with water
- Wipe once more with 75% alcohol
- Wait 5 minutes for the surface to dry completely
- Only then peel off the backing and stick the strip on
Prevention: Do not be lazy and skip the cleaning step. It is the key to success!
Mistake 2: The filament was fitted facing the wrong way and did nothing at all
Cause:
The filament direction was wrong: it faced the door leaf and not the gap.
Solution:
Before installing, confirm that the filament faces the gap side and touches the floor or the door frame.
A way to remember: The filament should "brush" the gap, not the door.
Mistake 3: No miter cut at the corner, leaving a gap
Cause:
When two strip brushes are butted together at right angles, a triangular gap is left at the corner.
Solution:
Make a 45-degree miter cut on each of the two strip brushes at the corner, and they will close perfectly into 90 degrees when joined.
Tools: Use a try square or a drafting triangle to make sure the 45 degrees is accurate.
Mistake 4: Screw holes too far apart, so the middle lifts
Cause:
The screw holes were too far apart, and the middle section lifted because of gravity or thermal expansion and contraction.
Solution:
Keep the screw hole spacing at 15-20 cm, and no more than 25 cm at most.
Mistake 5: Filament too long so the door catches, and forcing the door causes damage
Cause:
The wrong filament length was chosen (too long), so the friction when opening and closing the door was too great, which flattened the filament or loosened the base.
Solution:
- Measure the door gap correctly before buying (see How to choose a strip brush size: complete measuring guide and specification tables)
- If it is already installed, trim 2-3 mm off the filament with scissors
- Do not force the door open or shut; push it gently
Care and replacement | Extending the service life of a strip brush
Installation is only the first step. Regular care is what extends the service life.
Everyday care
How to clean:
- Vacuum the dust off the filament every month
- Avoid wiping hard with a wet cloth (it flattens the filament)
- If washing is needed, wipe gently with a slightly damp cloth
- Exterior strip brushes: rinse with clean water once every quarter
When opening and closing the door:
- Push the door gently; do not kick it
- When mopping, keep water from seeping into the adhesive backing
- When moving large items, take care not to knock the strip brush
Checklist
Check once every 3 months:
- Whether the filament is flattened or falling out
- Whether the base is loose or cracked
- Whether the adhesive backing has come away (adhesive type)
- Whether the screws are loose (screw-fixed type)
- Whether the seal is still good (shine a flashlight to check for light leaks)
When to replace
Replacement is recommended when any of the following occurs:
- Heavy filament loss (> 30%)
- The filament is flattened and does not spring back
- The base is cracked or deformed
- The adhesive backing has failed completely and the strip has come off several times
- The seal has clearly deteriorated, and noise / dust / pests are appearing again
Service life for reference:
- Adhesive type: 1-2 years
- Slot-in type: 5-7 years
- Screw-fixed type: 5-10 years
Removal tips
Removing the adhesive type:
- Heat the adhesive backing with a hair dryer for 30 seconds to soften it
- Pry it up slowly from one end with a slotted screwdriver
- Keep heating as you peel, to avoid leaving residue
- Remove any residue with a petroleum-based stain remover
Removing the slot-in type:
- Pry the base up from one end with a slotted screwdriver
- Pull it out along the direction of the channel
- Clean the dust out of the channel
Removing the screw-fixed type:
- Remove the screws in sequence with a screwdriver
- Take off the strip brush
- Fill the screw holes with wooden plugs or silicone sealant (if appearance matters)
To find out how well strip brushes work, see Do door seal strip brushes work? Measured sound insulation and pest-proofing data.
Conclusion: choose the right method and get it right the first time
Installing a strip brush really is not difficult.
As long as you choose the right installation method, prepare the tools and follow the steps, most people can do it themselves successfully.
Summary of the three installation methods
| Installation method | Difficulty | Time | Service life | Suitable for | Recommendation rating |
|---|---|---|---|---|---|
| Adhesive | ⭐ | 10-15 minutes | 1-2 years | Renters, first-time DIY, interior doors | ⭐⭐⭐⭐⭐ |
| Slot-in | ⭐⭐⭐ | 20-30 minutes | 5-7 years | Aluminum doors and windows, door frames with a channel | ⭐⭐⭐⭐ |
| Screw-fixed | ⭐⭐⭐⭐ | 30-60 minutes | 5-10 years | Your own home, long-term use, exterior doors | ⭐⭐⭐⭐⭐ |
Advice on choosing
First-time DIY beginners → adhesive (the simplest, and it can be re-stuck if it goes wrong)
Aluminum doors and windows with a channel → slot-in (the neatest, with the best result)
Your own home, for long-term use → screw-fixed (the most secure, done once and for all)
The keys to success
- Choose the right specification: filament length = door gap + 5-10 mm
- Have everything ready: prepare the tools so that you do not find something missing halfway through
- Clean the surface: the most important step for the adhesive type, and it cannot be skipped
- Test and adjust: always test after fitting, and adjust immediately if there is a problem
Time to get started!
If you have already bought a strip brush, you can start right now!
- Get the tools ready
- Clean the door frame
- Follow the steps in this article
- If you run into a problem, see the troubleshooting sections above or contact us
If you have not bought one yet, you can first read:
- The complete guide to strip brushes 2026 | Sizes and specifications, uses, installation methods and buying recommendations - learn the basics
- How to choose a strip brush size: complete measuring guide and specification tables - measure correctly
- Where to buy door seal strip brushes: Showba / TLW / hardware store prices compared - find the best-value channel
Or go straight to our product catalog and choose a suitable strip brush.
Installing a strip brush yourself saves money and is satisfying. Get started now and make your home more comfortable!